Contents
1Overview: what you will do
An XGSMHub device is a small Raspberry Pi computer that drives 4G modems with SIM cards. The Pi runs 24/7 and you control it entirely from a web browser: on your phone or computer, on site or remotely (through Gateway).
- Install: put the SIMs in the modems, connect the modem board to the Pi, power up.
- Go online: a network cable is recommended (most stable, nothing to configure), or choose a Wi-Fi network for the Pi from your phone through the device's setup Wi-Fi.
- Link Gateway: to open the dashboard from anywhere at
gateway.xvooc.id.vn. - Create accounts for your staff (optional) and start working.
The first time usually takes 15–30 minutes, mostly waiting for the device to boot and the modems to register their SIMs.
- Pi
- The Raspberry Pi computer inside the device, running the XGSMHub software.
- Setup Wi-Fi
- A temporary Wi-Fi broadcast by the Pi itself, named XGSM-Setup-xxxx (xxxx is unique per device), without a password. Used to open the setup page when the Pi has no network, or to change Wi-Fi.
- Setup page
- The Pi's web page for networking, Gateway linking and accounts. Open
http://10.42.0.1:8000/while your phone is on the setup Wi-Fi. - Gateway
- The server
gateway.xvooc.id.vnthat lets you open the device's dashboard remotely, from any network. - Dashboard
- The main interface to send SMS, make calls, view history and manage SIMs.
2What you need
| Item | Notes |
|---|---|
| XGSMHub device (Pi) | Software pre-installed, license activated. The Pi boots from the memory card or USB drive already fitted: do not remove it. |
| Pi power supply | Use the supplied adapter. Raspberry Pi recommends 5V at 2.5A or more for a Pi 3 (micro USB) and 5V 3A for a Pi 4 (USB-C). A weak supply is the most common cause of freezes and dropped modems. |
| Modem board and SIMs | Multi-port boards have their own power supply, not powered by the Pi. Insert the SIMs the right way round before powering the board. |
| Internet | A network (LAN) cable to your router is recommended. Use Wi-Fi (name + password) only when a cable is not possible. A Pi 3B only sees 2.4 GHz Wi-Fi; Pi 3B+ and Pi 4 see both 2.4 and 5 GHz (per Raspberry Pi specs). If your router has two names, pick the "2.4G" one. |
| A phone with Wi-Fi | To join the setup Wi-Fi and open the setup page (Android or iPhone). |
| Gateway account | Username and password for gateway.xvooc.id.vn, provided by VOOC TECH. Contact us first if you don't have one (see Support). |
3Connect the hardware
- Place the device somewhere ventilated and dry, near the router (if using Wi-Fi) and with good mobile signal for the SIMs.
- Insert the SIMs while the modem board is unpowered.
- Connect the modem board to the Pi with the supplied USB cable.
- (For wired network) plug a LAN cable from the router into the Pi's network port.
- Power the modem board first, then the Pi.
- Wait for the Pi to boot, about 1–3 minutes. A steady red LED means power; a blinking green LED means the Pi is reading its storage (booting).
4Network: cable or Wi-Fi
- More stable: the device runs 24/7 sending messages and making calls. Wi-Fi suffers from weak signal, interference and busy routers, which drop the connection to Gateway.
- Nothing to set up: plug in the cable and the Pi gets an IP address and is online immediately. No setup Wi-Fi, no phone disconnects while changing networks.
- Easy to move: plug the cable into the new router and you are done, no Wi-Fi name or password to re-enter.
- If you also set up Wi-Fi, the Pi only uses it as a backup when the cable has a problem.
The Pi works on cable, Wi-Fi, or both. Both get an IP address automatically from the router; nothing else to configure.
| Option | When | What the Pi does |
|---|---|---|
| Cable only (recommended) | Near the router, or a cable can be run. Most stable. | Plug in: automatic IP, online. |
| Wi-Fi only | No cable possible. | Choose the Wi-Fi on the setup page (section 5). |
| Cable and Wi-Fi | You want a backup path. | Prefers the cable. Unplug it and the Pi switches to Wi-Fi; plug it back and it returns to the cable. |
How to reach the setup page
- Pi has no network (no cable, no Wi-Fi yet): the Pi always broadcasts the setup Wi-Fi XGSM-Setup-xxxx.
- Pi is online: the setup Wi-Fi only appears for about 2 minutes after power-on, and stays on while a phone is connected or the setup page is in use. Missed it? Unplug the Pi, plug it back and connect right away.
- Pi loses its network for about 1 minute (router off, Wi-Fi password changed, device moved): the setup Wi-Fi comes back on its own so you can set a new network.
5The setup page (4 steps)
Open the setup page on your phone
- On your phone go to Settings → Wi-Fi and choose XGSM-Setup-xxxx (no password). With several devices, each has different last 4 characters.
- Your phone may say "Wi-Fi has no Internet": choose keep / stay connected. This is normal, the setup Wi-Fi only talks to the Pi.
- Open a browser (Chrome, Safari) and type exactly
http://10.42.0.1:8000/. The setup page appears.
10.42.0.1 cannot be reached. Temporarily turn off mobile data and reload.Step 1: Network ("Kết nối mạng")
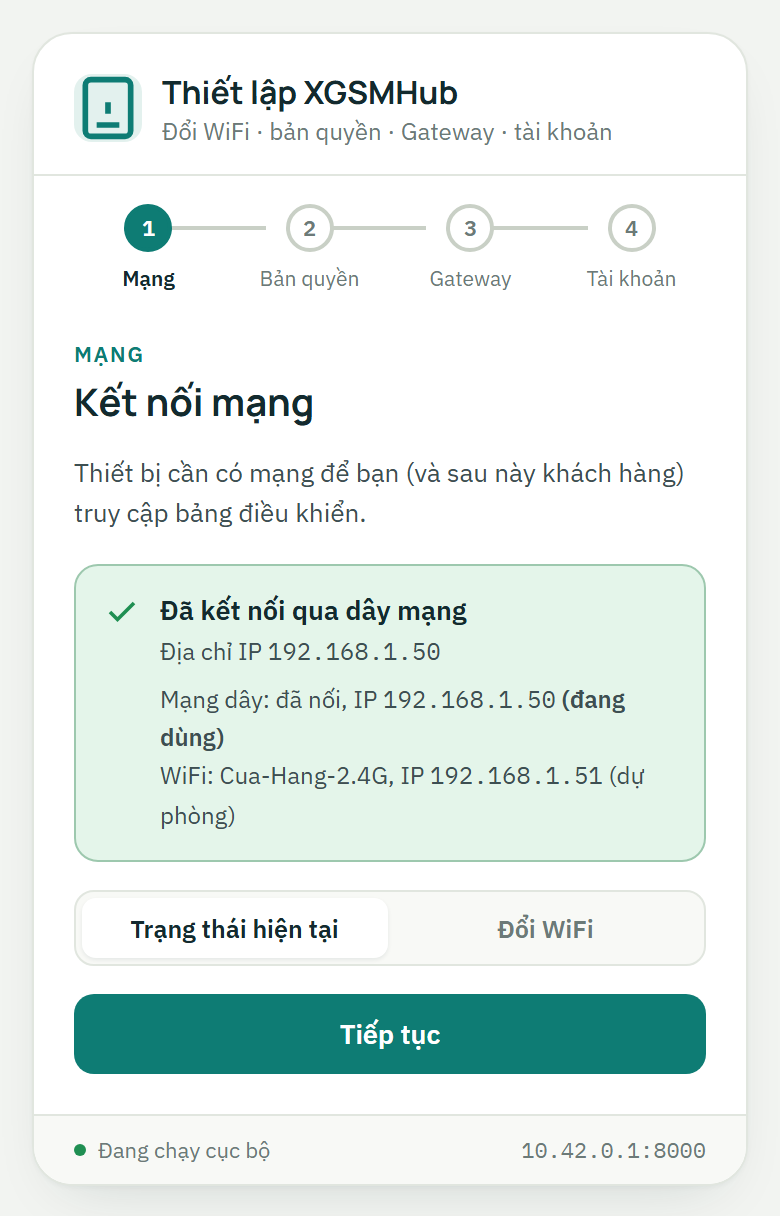
- The Trạng thái hiện tại (Current status) tab shows whether the Pi is online: Mạng dây (wired: connected / not plugged) and WiFi (network name, IP), which path is đang dùng (in use) and which is dự phòng (backup).
- If the cable is plugged in and you see "Mạng dây: đã nối" (wired: connected), you can skip Wi-Fi and press Tiếp tục (Continue).
- To use Wi-Fi: open the Đổi WiFi (Change Wi-Fi) tab, pick your network from the list (or type its name if missing), enter the password and press Kết nối WiFi (Connect Wi-Fi).
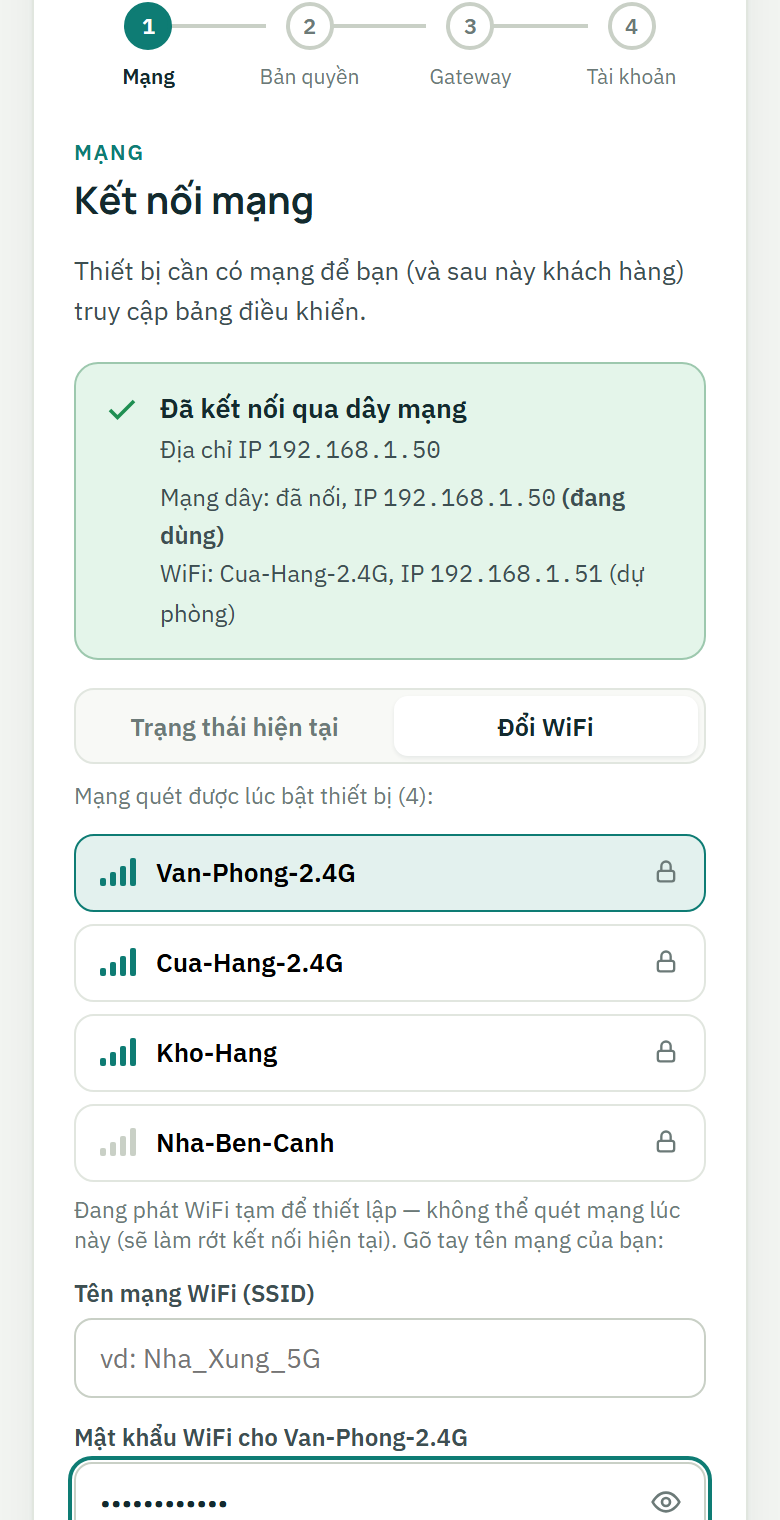
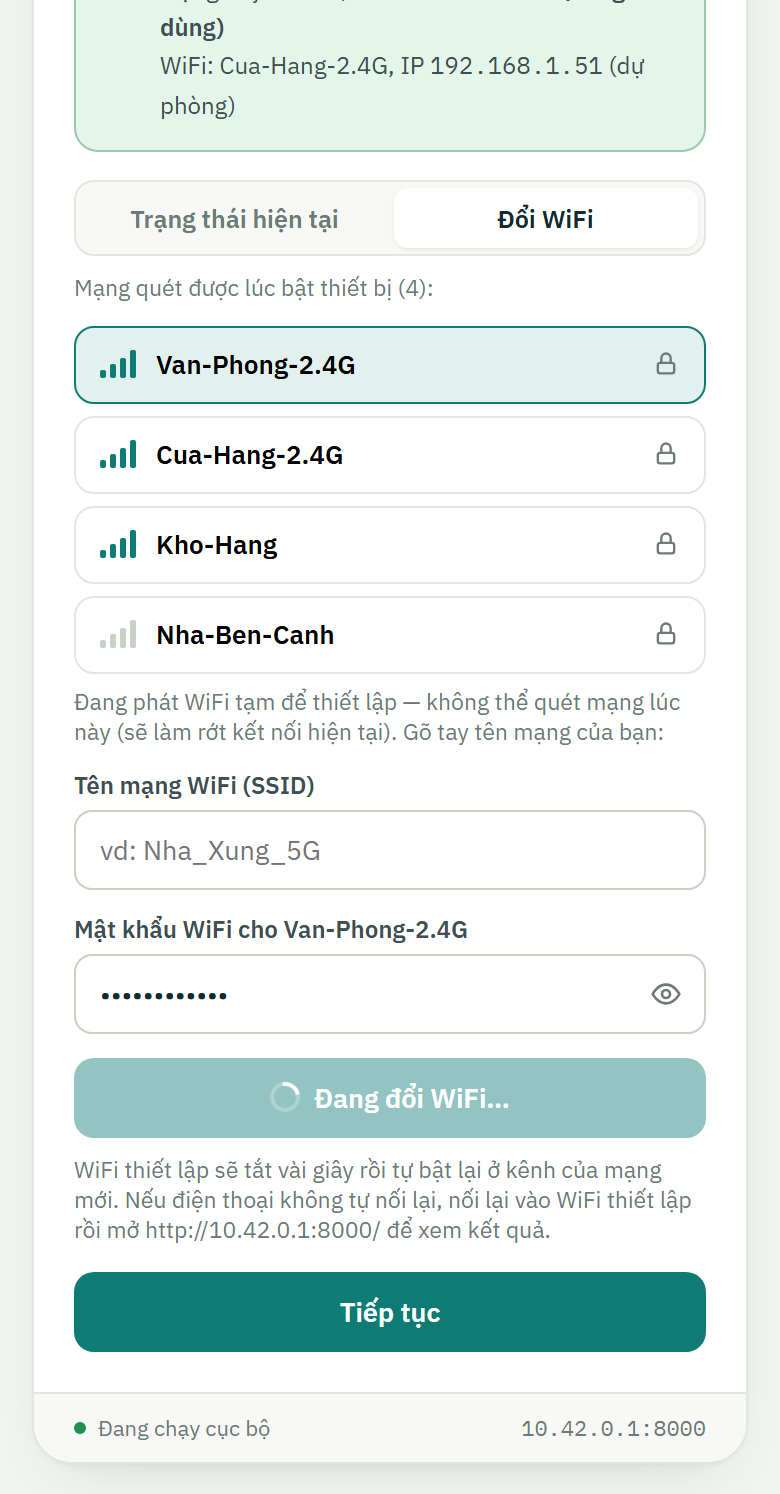
When you press Kết nối WiFi, if the new Wi-Fi uses a different radio channel, the Pi must switch the setup Wi-Fi off for a few seconds and broadcast it again. Your phone loses the connection and the page may show an error or freeze. This is normal, nothing is broken.
- Wait 10–20 seconds.
- Open your phone's Wi-Fi settings and reconnect to XGSM-Setup-xxxx (many phones do not reconnect by themselves).
- Reopen
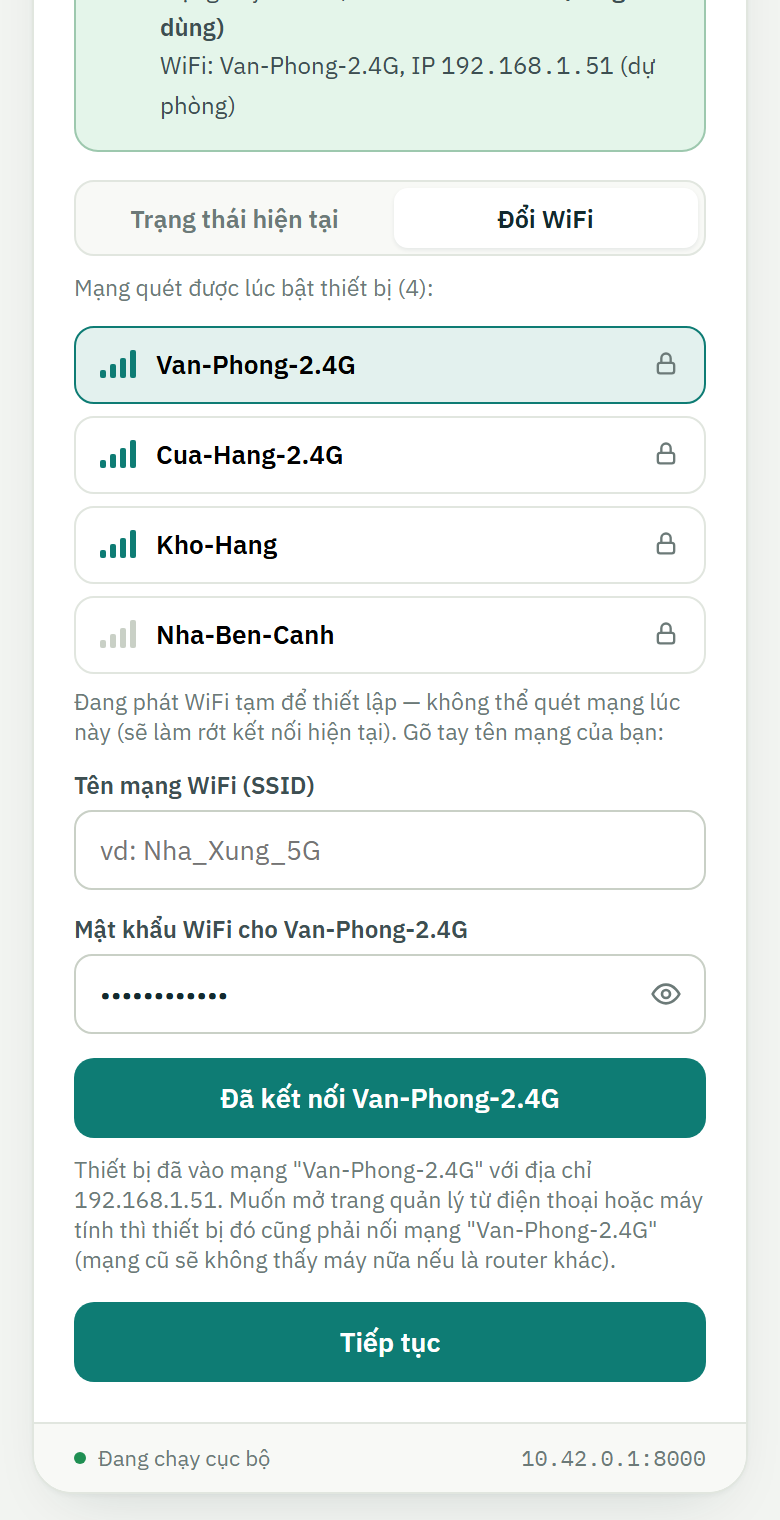
http://10.42.0.1:8000/. The page shows "Đã kết nối <Wi-Fi name>" (Connected) with the Pi's new IP address.
Do not press Kết nối WiFi repeatedly while waiting. See the explanation in section 6.
- "Mật khẩu WiFi không đúng." (Wrong Wi-Fi password): check the password (case-sensitive) and try again. The Pi keeps its previous network and the setup Wi-Fi comes back immediately.
- "Không tìm thấy mạng WiFi này" (Network not found): the Wi-Fi is too far, switched off, or is a 5 GHz network a Pi 3B cannot see.
- You can rename the setup Wi-Fi for easy recognition (e.g. Pi-Warehouse-1) and press Lưu tên WiFi (Save Wi-Fi name). Your phone drops and must reconnect under the new name.
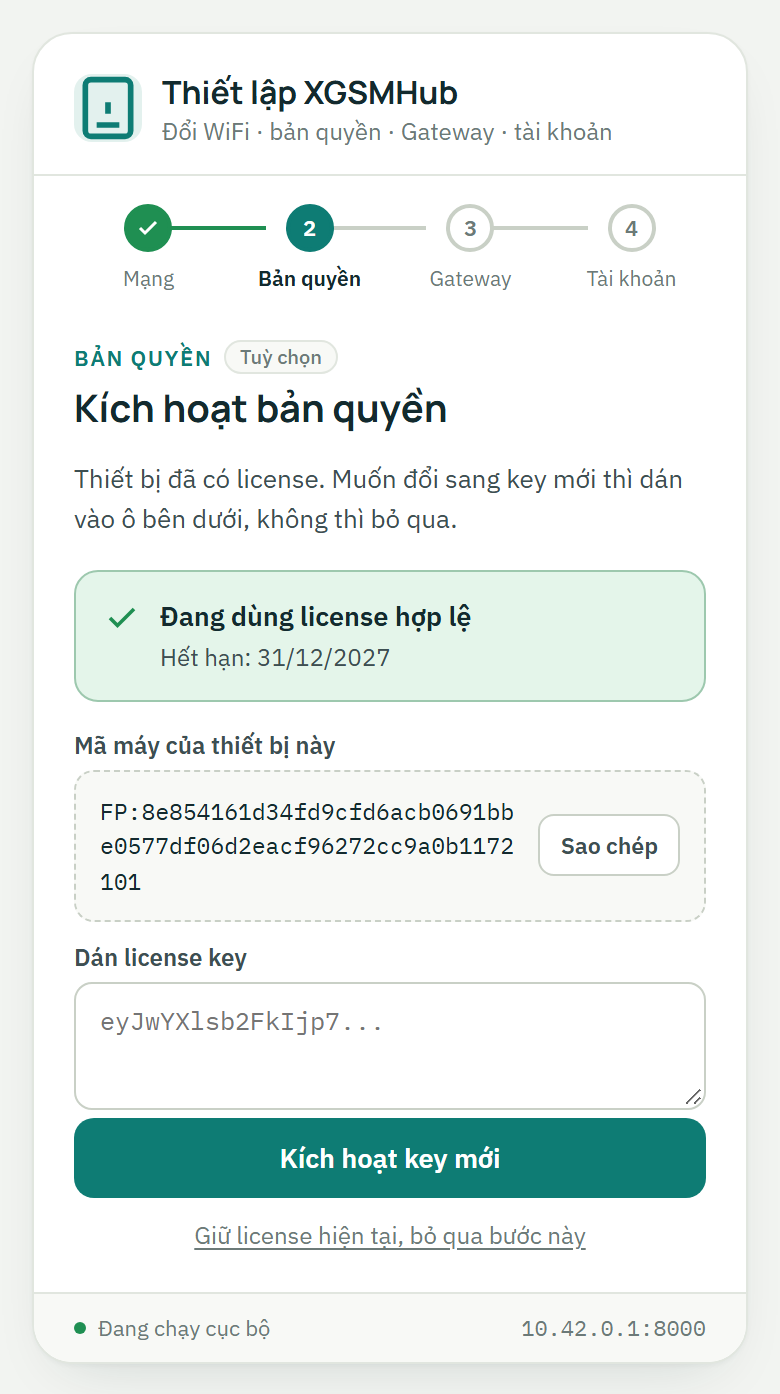
Step 2: License ("Kích hoạt bản quyền")
Devices bought from VOOC TECH are already activated. Just press Giữ license hiện tại, bỏ qua bước này (Keep current license, skip this step).
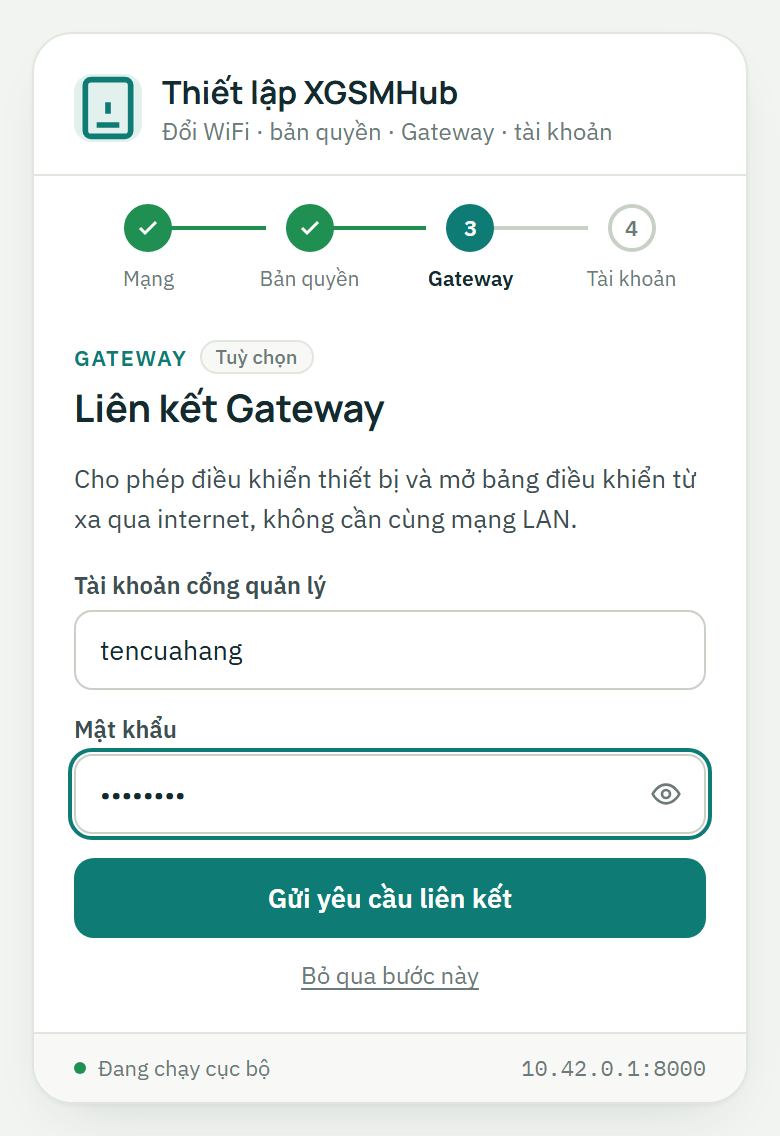
Step 3: Link Gateway ("Liên kết Gateway", for remote use)
- Enter your Tài khoản cổng quản lý (portal username) and Mật khẩu (password), i.e. your
gateway.xvooc.id.vnaccount. - Press Gửi yêu cầu liên kết (Send link request). The Pi needs Internet for this step.
- Devices bought from VOOC TECH are usually approved automatically within seconds. If the page keeps showing "Đang chờ quản trị viên duyệt thiết bị…" (Waiting for approval) for more than a few minutes, contact VOOC TECH.
Don't need remote access? Press Bỏ qua bước này, thiết lập sau (Skip, set up later); you can come back to this step through the setup Wi-Fi at any time.
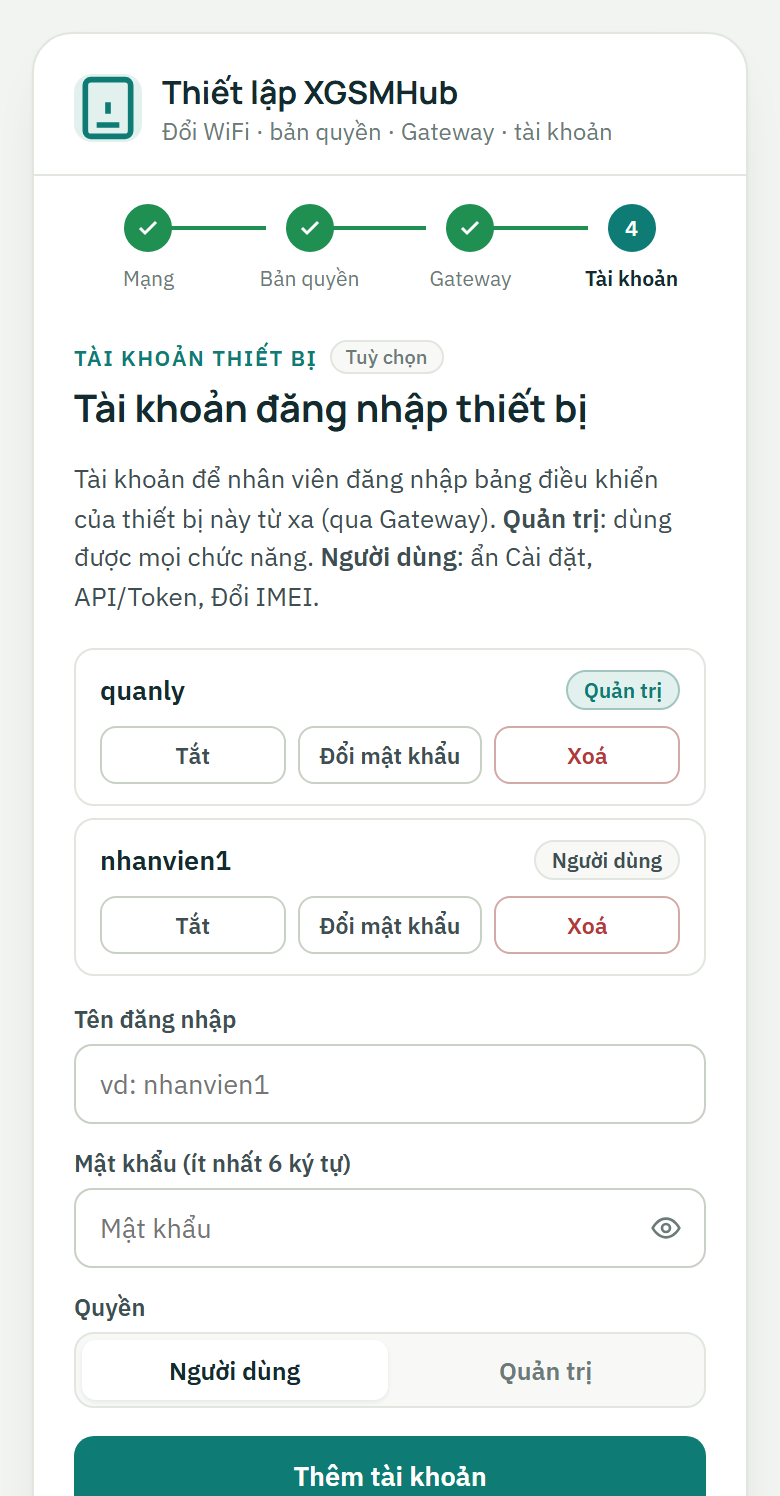
Step 4: Device accounts ("Tài khoản đăng nhập thiết bị", optional)
- Create logins for staff to open this device's dashboard through Gateway: enter a username (e.g. staff1), a password, choose a role, press Thêm tài khoản (Add account).
- Quản trị (Admin): all features. Người dùng (User): no Settings, API/Token or IMEI change.
- When done press Hoàn tất (Finish).
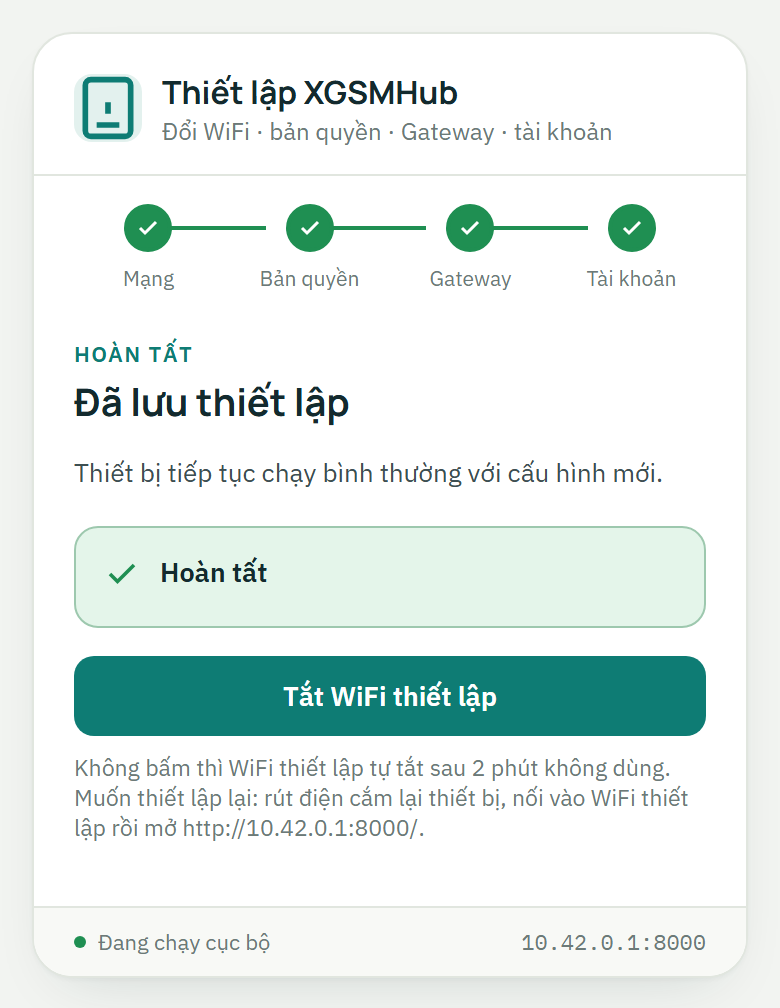
Finish
Press Tắt WiFi thiết lập (Turn off setup Wi-Fi) so the Pi stops broadcasting it. If you forget, the Pi turns it off after about 2 idle minutes (once it is online).
6Why your phone drops when changing Wi-Fi
The Raspberry Pi's Wi-Fi chip joins your Wi-Fi and broadcasts the setup Wi-Fi at the same time, but both must share one radio channel. When you choose a new Wi-Fi on a different channel, the Pi has to:
- Turn off the setup Wi-Fi: your phone is disconnected.
- Join the new Wi-Fi, which takes about 3–10 seconds.
- Broadcast the setup Wi-Fi again on the new Wi-Fi's channel.
If the new Wi-Fi uses the same channel as the old one, the setup Wi-Fi stays on and your phone does not drop.
http://<Pi-IP>:8000/ locally your device must also be on "Floor 2". Two different routers are usually two separate networks. Through Gateway you can open the dashboard from any network.7Open the dashboard, check the modems
From anywhere (through Gateway)
- Open
https://gateway.xvooc.id.vn/and sign in with your portal account. - Choose the device in the list to open its dashboard.
On the same network (without Gateway)
Open http://<Pi-IP>:8000/. The Pi's IP is shown on the setup page (Network step) or in your router's list of connected devices.
Check modems and SIMs

- The Slot table lists each modem: port, status, carrier, phone number, signal strength.
- After power-on the modems need some time to read the SIMs and register. Wait a few minutes and check again.
- A slot shows no SIM: power off the board, check the SIM orientation, power it back on.
- Send one SMS to your own number to confirm everything works. Feature-by-feature instructions: User guide.
8Change Wi-Fi, move the device
- If the Pi is still online: unplug the Pi and plug it back; the setup Wi-Fi appears for about 2 minutes. If the Pi has lost its network (moved, router password changed): wait about 1 minute, the setup Wi-Fi appears on its own.
- Join XGSM-Setup-xxxx from your phone and open
http://10.42.0.1:8000/. - Đổi WiFi tab → choose the Wi-Fi → enter the password → Kết nối WiFi.
- Your phone drops for a few seconds (see section 6). Reconnect to XGSM-Setup-xxxx and reopen the page to see "Đã kết nối … IP …".
- Press Tắt WiFi thiết lập when finished.
The Pi remembers Wi-Fi networks it has joined. Switching back to a network used before (even after its password changed) works exactly the same way: enter the new password.
9Software updates
- The Pi updates itself: it checks for a new version about every 6 hours and 5 minutes after each start. It restarts the service afterwards and keeps all data.
- To update right away: in the dashboard press Cập nhật phần mềm (Update software) in the top bar, or Settings → check for updates.
- The running version is shown in the dashboard's top bar.
10Troubleshooting
My phone cannot see the XGSM-Setup-xxxx Wi-Fi
When the Pi is online the setup Wi-Fi only broadcasts for about 2 minutes after power-on. Unplug the Pi, plug it back, wait 1–2 minutes and look again. Still nothing: the Pi may not have finished booting (green LED still blinking a lot) or the power supply is weak. Try a proper power supply.
After pressing "Kết nối WiFi" my phone disconnected and the page shows an error
Normal. The Pi has to switch the setup Wi-Fi off for a few seconds to join a Wi-Fi on another channel. Wait 10–20 seconds, reconnect to XGSM-Setup-xxxx and reopen http://10.42.0.1:8000/ to see the result. See section 6.
The Pi joined the new Wi-Fi but I cannot open the dashboard by IP
Your computer / phone must be on the same network as the Pi. Two different routers (e.g. ground floor and first floor) are usually separate networks. Or open it through Gateway gateway.xvooc.id.vn, from any network.
The setup page says "Mật khẩu WiFi không đúng." (wrong password)
Check the password, including upper/lower case and spaces. The Pi keeps its previous network; you can try again right away.
10.42.0.1 does not open even though I am on XGSM-Setup
Turn off mobile data (4G) on the phone, choose "stay connected" when the phone says the Wi-Fi has no Internet, and type exactly http://10.42.0.1:8000/ (including :8000).
Modems keep dropping, the Pi restarts by itself, slots come and go
Usually the power supply. Use the supplied adapter for the Pi and a separate, strong enough supply for the modem board. The dashboard's Raspberry Pi panel shows an under-voltage warning when the Pi's supply sags.

The dashboard says the license is invalid
Send the Mã máy (Device ID, on the setup page or dashboard) to VOOC TECH for a new key. Do not reinstall the operating system before contacting us.
The device is missing on Gateway / shows offline
Check the Pi is online (setup page, Network step). If you changed Gateway accounts, redo the Gateway link step on the setup page.
I want to reinstall the software or the operating system
Please do not reinstall it yourself: the device ships pre-installed and its license is tied to the hardware. Contact VOOC TECH (see Support) and we will help you remotely.
11Useful commands (over SSH)
| Task | Command |
|---|---|
| Live log | sudo journalctl -u gsm4ghub -f (exit: Ctrl+C) |
| Restart the software | sudo systemctl restart gsm4ghub |
| Is the software running | systemctl status gsm4ghub |
| Network in use | nmcli device status and ip route |
| Check the power supply | vcgencmd get_throttled, throttled=0x0 is good |
| Reboot the Pi | sudo reboot |
| Shut down safely | sudo poweroff, wait until the green LED stops blinking before unplugging |
12Support
When asking for help, include a screenshot of the setup page or dashboard, the software version and what you did (with times if possible).
- Zalo / phone: +84 968 338 547 (open Zalo)
- Email: boolbits@gmail.com
- Portal: gateway.xvooc.id.vn