Contents
1Key terms at a glance
Spend one minute on this part and the rest of the guide will be much easier to follow.
- GSM hub
- A box holding several small 4G modems, each with one SIM card. You connect the hub to your computer with a USB cable.
- Slot / Port
- Each modem in the hub is one slot (01, 02, 03…). Each row in the software's table is one slot.
- COM Port
- The port name the computer gives a modem (e.g.
COM31on Windows,/dev/ttyUSB2on Raspberry Pi). It may change when you unplug and replug the hub. - Custom Port
- Your own name for a slot (e.g. "Warehouse A - 01") so it's easy to remember. The name is tied to the module's serial number, so it stays even if you plug it into a different USB port.
- IMEI
- The modem's identification number (like a car's chassis number). It is not the SIM's number.
- SIM Serial (ICCID)
- The code printed on the SIM card, used to identify exactly which SIM is which.
- USSD
- Dial codes like
*101#for checking your balance, topping up and so on, just like on a phone. - OTP
- A one-time verification code (4–8 digits) that banks and apps send to the SIM. The software picks out the code for you automatically.
- Gateway
- The relay server gateway.xvooc.id.vn that lets you open your dashboard from anywhere, without a static IP or opening ports on your router.
- Web dashboard
- The control screen you open in a web browser. It looks just like the Windows program, so once you learn one you can use both.
2Quick start
- Prepare your SIMs: the SIMs must still be valid and have credit or a plan if you want to send messages or make calls. Insert the SIMs into the hub's modems while the hub is unplugged from power.
- Choose the machine that runs the software: a Windows computer (used on site) or a Raspberry Pi (runs 24/7, managed from a web browser). See Installation and activation.
- Activate your license: the first time you open the software, it shows a Machine ID. Send this ID via Zalo 0968 338 547 (Zalo is a popular Vietnamese messaging app) to get your license, then paste the license in and you're done. On Windows you can also click 3-day trial (Dùng thử 3 ngày).
- Connect the hub to the computer with the USB cable and power the hub on. The software detects each modem automatically and reads the carrier, phone number and balance. Wait until the Status column shows Ready (about 1–2 minutes).
- Start using it: select SIMs in the table → click Send SMS or Call. To use it remotely, see Remote use via the Gateway.
3Installation and activation
On a Windows computer
- On the home page, go to Download and click Download for Windows. A Google Drive page opens; click the download icon in the top-right corner.
- Run the file
gsm4ghub-setup-….exe. If Windows shows "Windows protected your PC", click More info → Run anyway. - Open the software. Read the Usage Policy & Disclaimer, tick I have read and agree to the terms above. (Tôi đã đọc và đồng ý với các điều khoản trên.) and then click I agree and continue (Tôi đồng ý và tiếp tục).
- The Activate the application window (Kích hoạt ứng dụng) shows your Machine ID. Click Copy Machine ID (Copy mã máy) and send it via Zalo to get a license. Paste the license into the Paste the license key here box (Dán license key vào đây) → Activate (Kích hoạt). On your very first installation you can click 3-day trial (Dùng thử 3 ngày) instead.
- The software shows "Scanning COM ports, please wait..." (Đang quét COM ban đầu, vui lòng chờ...) and then opens the main screen. Plug in the hub if you haven't already.
On a Raspberry Pi
The Pi runs the software in the background (no screen needed), and you control everything from a web browser. You need a Pi 3 or newer running Raspberry Pi OS. Step-by-step guide with screenshots for beginners (hardware, network, linking Gateway, troubleshooting): Setting up your XGSMHub device (Raspberry Pi). Devices ship with the software pre-installed by VOOC TECH; if it ever needs reinstalling, contact us for remote help.
Technical details
| Default web port | 8000 — open http://<Pi-IP-address>:8000/ on a device on the same network |
| Updates | The Pi updates itself; your settings, data and recordings are kept |
| View the log | sudo journalctl -u gsm4ghub -f |
| Restart | sudo systemctl restart gsm4ghub |
First-time setup in the browser
The setup pages on the Pi are in Vietnamese, so the original button names are shown in brackets below.
- If the Pi is already connected by network cable or WiFi: open
http://<Pi-IP>:8000/. If the Pi has no network yet: the Pi creates its own temporary WiFi network with no password called XGSM-Setup-xxxx (xxxx is unique to each Pi, so several Pis can be told apart). Connect your phone to this WiFi, then openhttp://10.42.0.1:8000/. In the Network step of the setup page you can rename this WiFi (e.g. Pi-Warehouse-1). - Step 1/3 – Network connection: choose your WiFi network, enter its password and click Connect WiFi (Kết nối WiFi).
- Step 2/3 – License activation: click Copy (Sao chép) next to the Machine ID, send it via Zalo, then paste the license key you receive → Activate (Kích hoạt). You can also create a device login account here (User / Admin).
- Step 3/3 – Link to the Gateway (for remote use): enter your Gateway portal account → Send link request (Gửi yêu cầu liên kết), or Skip this step (Bỏ qua bước này).
- The final screen shows the Admin token (Token quản trị). The token is shown only once, so copy it down carefully. Click Turn off setup WiFi (Tắt WiFi thiết lập).
4Main screen
The GSM MANAGEMENT tab has the GSM Control panel at the top and the GSM Module List table below it. The other tabs are 60-Day History, Settings (only on the web dashboard opened locally) and Text to Speech. The Windows program also has a Remote accounts tab (Tài khoản từ xa).
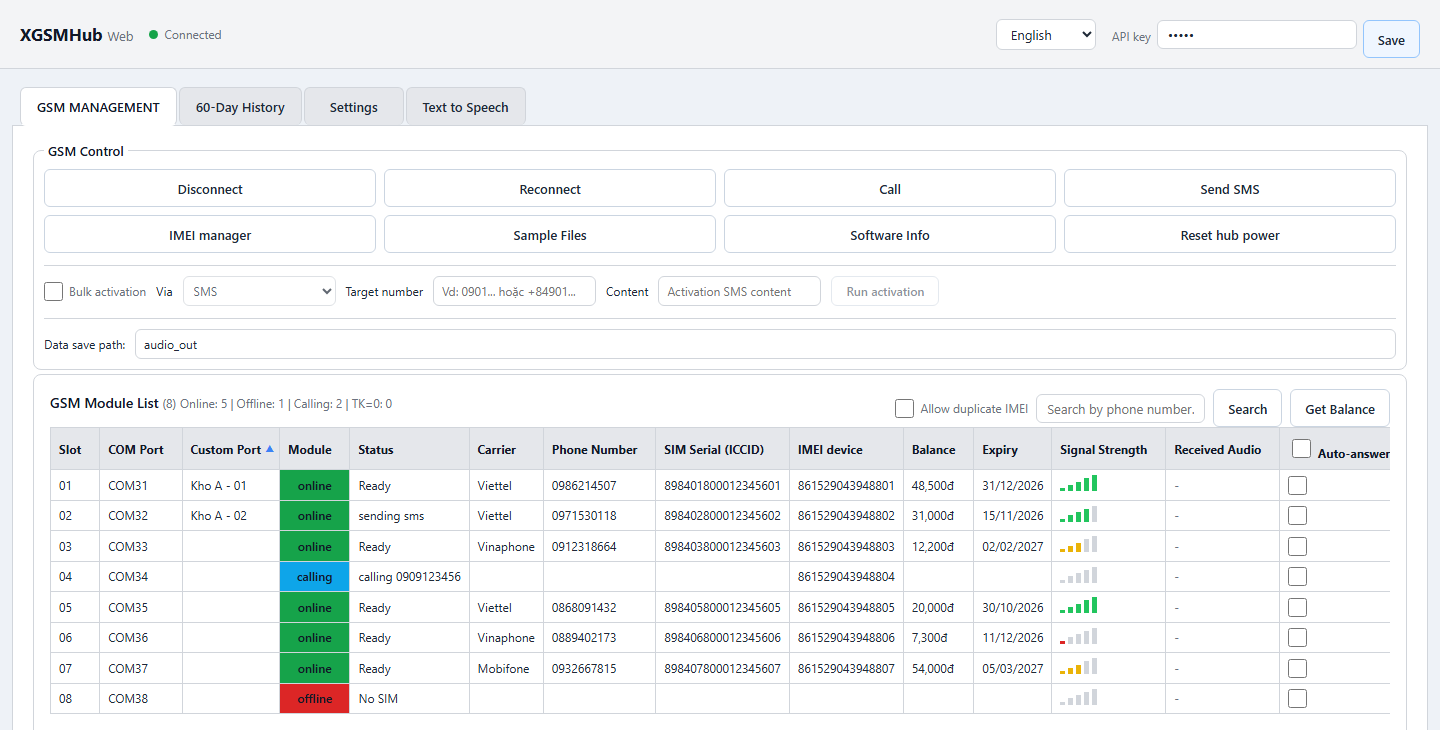
Top-right corner: choose the language (Tiếng Việt / English) and log in. If you open the dashboard locally, enter the API key → Save; if you open it through the Gateway, enter your Username / Password → Log in. A green Connected dot means you are receiving live data from the machine.
SIM list table: what each column means
| Column | Meaning |
|---|---|
| Slot | The port's number. |
| COM Port | The computer port the modem is connected to. |
| Custom Port | Your own name for the slot. Double-click the cell to rename it, press Enter to save, Esc to cancel. |
| Module | Connection status, shown by the colour of the whole cell: online ready/working, calling on a call, Duplicate IMEI blocked because its IMEI is a duplicate, SIM error / Weak signal, offline / IMEI error. |
| Status | What the slot is doing: Ready, Fetching data (reading SIM information), No SIM, SIM Locked, Error (Weak signal), "Sending to number…", "Calling number…", "Incoming call from…"… |
| Carrier, Phone Number, SIM Serial (ICCID) | Read automatically from the SIM. The phone number may take a few minutes to appear (it is taken from the balance reply message). |
| IMEI device | The modem's IMEI. Shows "No IMEI" if the factory never wrote an IMEI to the module (it still works normally). |
| Balance, Expiry | Checked automatically once when the SIM joins the network. Click Get Balance to check again. |
| Signal Strength | 5 bars: red = weak (≤2 bars), yellow = medium, green = good (≥4 bars). Hover the mouse over it to see the dBm value. |
| Received Audio | The ▶ Play button plays the slot's most recent call recording. |
| Auto-answer incoming calls | Tick it to make the slot answer calls by itself, record them and turn the speech into text (used for OTPs delivered by phone call). Unticked: incoming calls are rejected. The box in the column header turns it on/off for all slots. |
| Force VoLTE | Ticked = force VoLTE (calls over 4G); unticked = automatic. The modem restarts for about 30 seconds. If forcing doesn't work, the software switches back to automatic by itself. |
Selecting rows, sorting, searching
- Select 1 row: click the row. Select several: drag the mouse across several rows, or hold Shift (select a continuous range) or Ctrl (add/remove individual rows). Ctrl+A selects everything. On a phone: tap to select/deselect.
- Sort: click a column header; click again to reverse the order. By default the table is sorted by "Custom Port", and empty cells always go last.
- Change the column layout: drag a header to move the column, drag its edge to resize it, double-click the edge to fit the content. Your browser remembers the layout.
- Search by phone number: type into the Search by phone number... box → Search (or Enter). The software selects and scrolls to the slot with that number.
- Allow duplicate IMEI: unticked by default, meaning each IMEI may only be on the air in one slot. Tick it if you deliberately use several SIMs with the same IMEI at the same time.
Right-click menu
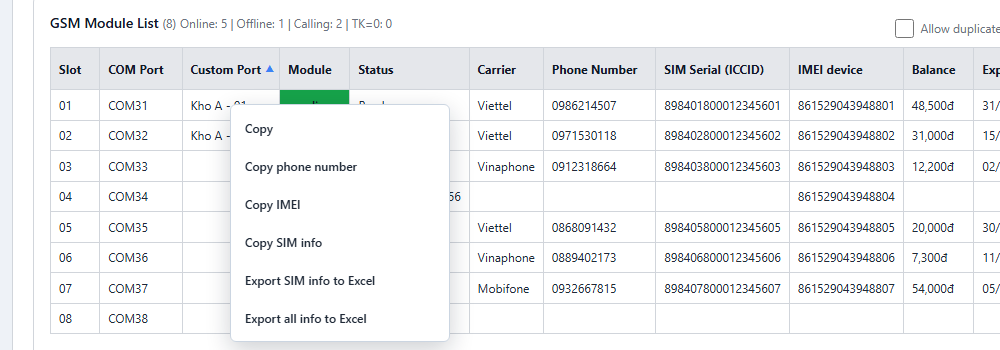
- Copy: copies all information of the row. Copy phone number, Copy IMEI, Copy SIM info (serial, number, balance, expiry).
- Export SIM info to Excel (
sim_info.xlsx) and Export all info to Excel (slot_info.xlsx).
5GSM Control buttons

| Button | What it does |
|---|---|
| Disconnect | Disconnects the selected slots (none selected = all). Use it before unplugging the hub or changing SIMs. |
| Reconnect | Reconnects the selected slots (none selected = all). Use it when a slot reports an error or you have just changed a SIM. |
| Call | Opens the call window. See Calls and recording. |
| Send SMS | Opens the SMS window. See Sending SMS. |
| IMEI manager | Change IMEIs and manage IMEI sets per SIM. See IMEI management. |
| Sample Files | Download sample Excel files: the SMS sample Excel file (columns "Số điện thoại" = phone number, "Nội dung" = message) and the Call sample Excel file (column "Số điện thoại" = phone number). |
| Software Info | Shows the version and license expiry, and lets you renew the license. See License. |
| Reset hub power | Raspberry Pi only: cuts the hub's power for a few seconds and then restores it (needs a relay connected to a GPIO pin). See Raspberry Pi. |
| Check for updates | Windows only: finds and installs a new version. |
Below the buttons are the Bulk activation row (see section 8) and the Data save path box: the folder for recordings, audio files and exported Excel files, on the machine running the software (default audio_out). It saves automatically when you click outside the box after editing.
6Sending SMS
The general process: select the SIMs that will send in the main table → click Send SMS → choose a mode → Load data → check the table → Start sending.
Manual mode
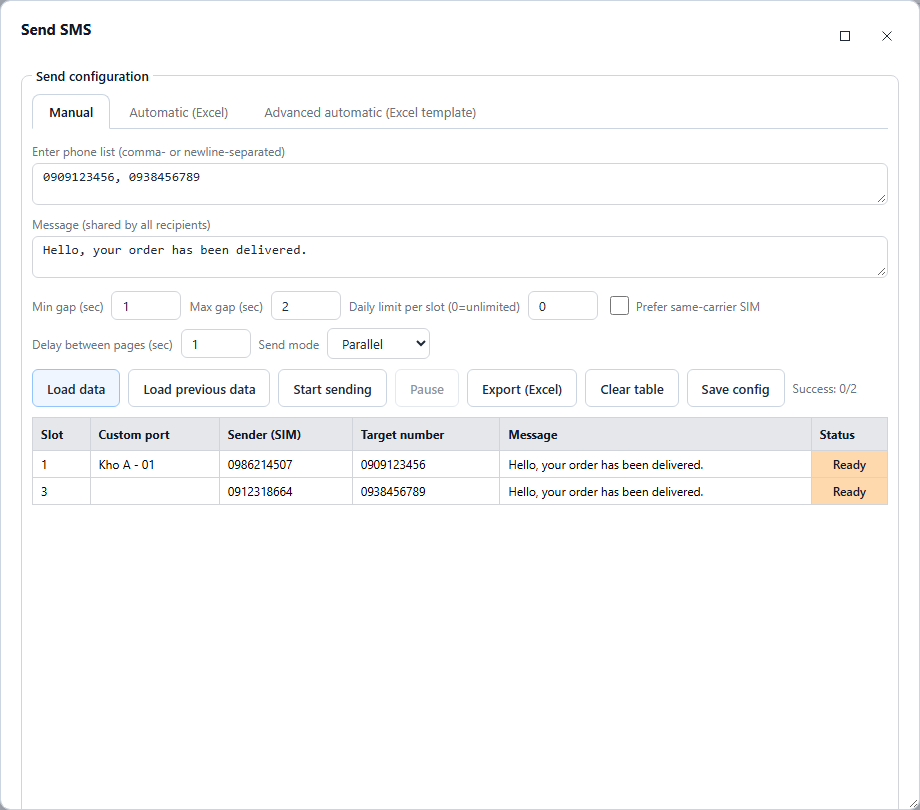
- Enter phone list box: separate the numbers with commas or new lines.
- Message box: one message shared by all numbers (up to 2000 characters; long messages are split into pages automatically).
- Click Load data. The table below shows one row per message: sending slot, sending SIM number, recipient, message and the status Ready.
- Click Start sending. The status changes: Sending... → Success (green) or Error: … (red).
- 1 recipient + several selected SIMs: every SIM sends to that number (useful for activation and testing).
- Several numbers: paired in order — number 1 with SIM 1, number 2 with SIM 2… Extra numbers (more numbers than SIMs) are dropped unless Prefer same-carrier SIM is turned on. For long lists, use Excel mode.
Automatic (Excel) mode
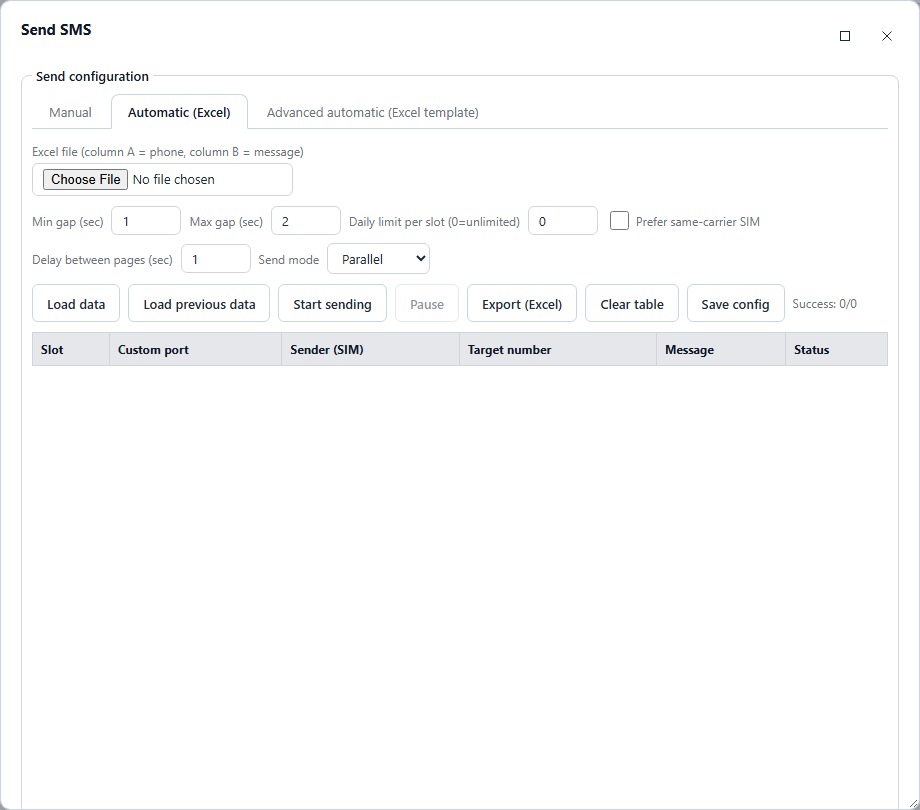
- Download the sample file: Sample Files → SMS sample Excel file.
- Fill in column A = phone number and column B = message, one message per row. The header row is skipped automatically. Only the first sheet is read, and the file must be
.xlsx. - Choose the file → Load data. The numbers are shared out evenly, in rotation, among the selected SIMs. Numbers in the wrong format are skipped automatically and the software tells you how many.
- Start sending.
Advanced automatic (Excel template) mode — personalised messages
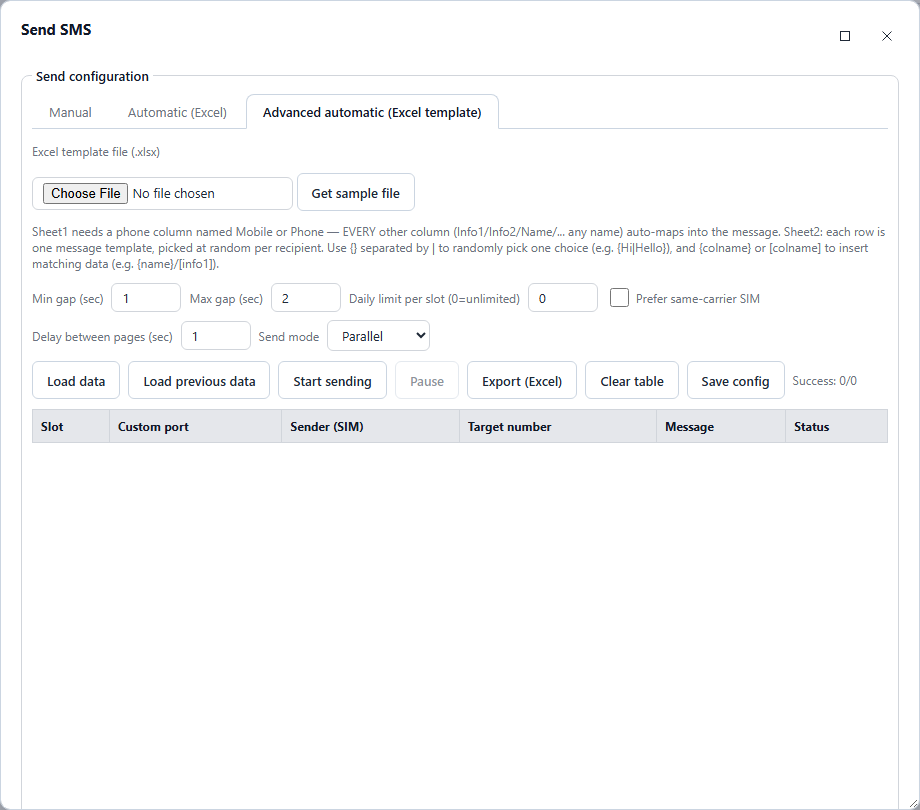
Each recipient gets their own message with their name, amount and so on. Click Get sample file to get a file with the right structure:
- Sheet1: must have a column named Mobile or Phone. The other columns (e.g.
Info1,Name) hold the data inserted into the message. - Sheet2: column A, one message template per row. Each recipient gets one template picked at random.
- Inserting data: write
[Name]or{Name}. For exampleHello [Name], your balance is [Info1]. - Random wording:
{Hi|Hello|Dear}— the software picks one, so the messages aren't all identical and are less likely to be treated as spam.
Gaps, limits and control buttons
| Setting | Meaning |
|---|---|
| Min gap / Max gap (sec) | A random pause between 2 messages from the same SIM. Set at least a few seconds so carriers don't block the SIM for spam. |
| Daily limit per slot | The maximum number of successful messages each SIM may send per day. 0 = unlimited. |
| Prefer same-carrier SIM | Viettel numbers go to Viettel SIMs, Vina numbers to Vina SIMs and so on (based on the number prefix); when a SIM reaches its limit, the rest go to other SIMs. Usually cheaper, with a higher success rate. |
| Delay between pages | For long messages split into several pages: how long to wait between pages. |
| Send mode | Parallel: all SIMs send at the same time (fast). Sequential: one message at a time (safer). |
| Start sending / Stop | While sending, the button changes to Stop, which cancels everything. |
| Pause / Resume | Pause part-way through; click Resume to finish the rest. |
| Load previous data | Reloads the messages from the previous run that were not sent successfully, so you can send them again. |
| Export (Excel), Clear table, Save config | Save the results to Excel, clear the table, save your settings for next time. |
The Success: x/y line comes with an estimate "About … left (done around HH:MM)". If you reload the page (F5) while sending, you still see the correct progress, and the window reopens by itself.
7Calls and recording
Select SIMs in the main table → Call. The window has 3 tabs: Automatic (Excel), Manual, Forwarding.
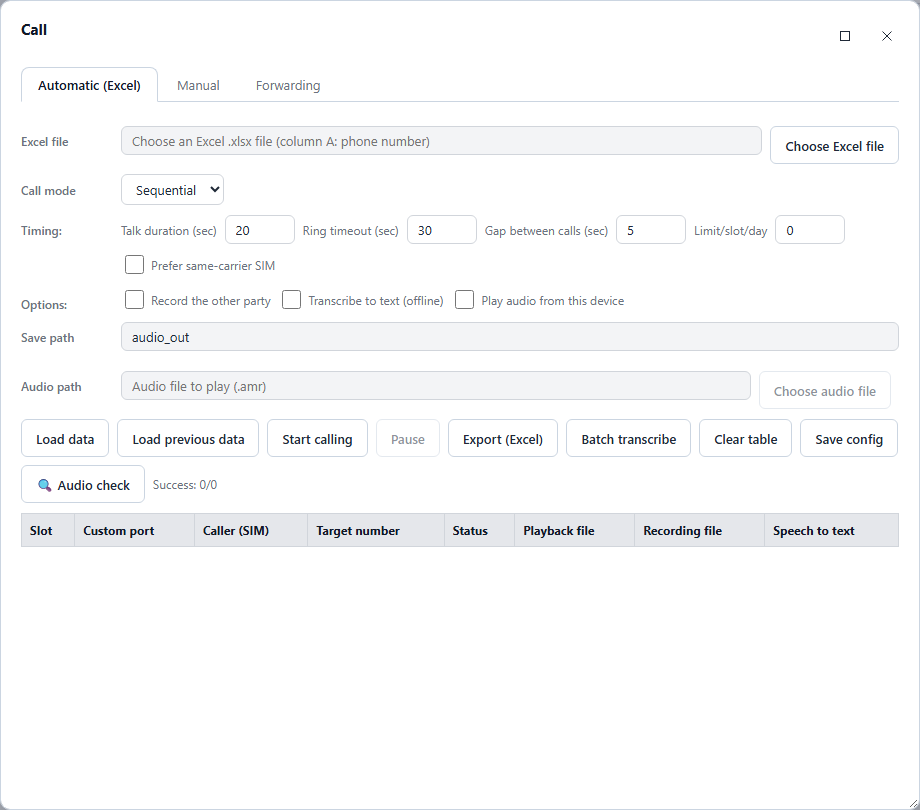
Automatic calls from Excel
- Download Sample Files → Call sample Excel file and fill in column A = phone number.
- Choose Excel file, then pick the Call mode: Sequential or Parallel.
- Set the timing:
- Talk duration (sec): hang up this many seconds after the other person answers.
- Ring timeout (sec): how long to let it ring before hanging up if nobody answers.
- Gap between calls (sec): pause between 2 calls. Limit/slot/day: counts every dial attempt, even if nobody answers.
0= unlimited.
- Options: Record the other party, Transcribe to text (offline) (recognises Vietnamese speech), Play audio from this device (choose an audio file to play when the other person answers, e.g. a greeting or an announcement).
- Load data → Start calling. You also have Pause / Stop, Export (Excel) and Batch transcribe.
The results table has a Recording file (▶ Play) column and a Speech to text column (what was said, converted to text).
.amr files. On the web you can choose .amr/.wav/.mp3. You can create an .amr file from text in the Text to Speech tab. The 🔍 Audio check button checks whether the modem can play and record audio (select exactly 1 slot).Manual calls
Enter the Phone number in the box; the options are the same as in automatic mode. Numbers are paired with SIMs the same way as for manual SMS.
Call forwarding
- Select the SIMs in the main table, open the Forwarding tab and click Load data.
- Enter the Number to forward calls to.
- Click Forward to turn it on (all calls to the SIM are forwarded to that number) or Cancel forwarding. The Result column reports on each SIM. Viettel SIMs automatically use a backup method via an SMS to 1322.
Auto-answering incoming calls (voice OTP)
Some services read out OTP codes in a phone call. Tick Auto-answer incoming calls on that SIM's row in the main table: the SIM answers by itself, records the call and turns the speech into text (Vietnamese speech is recognised); the result appears in History. If it is unticked, incoming calls are rejected automatically. The setting is remembered for each SIM/module.
8Bulk activation and top-up
The Bulk activation row, right below the control buttons, does the same job on many SIMs at once.

- Tick Bulk activation.
- In the Via box, choose a mode: SMS, Call, Call 900 (Activate SIM) or Top up.
- Enter the Target number (plus the Content for SMS, or the Call duration for Call).
- Select the SIMs in the main table (except in Top up mode) and click Run activation. The results appear in the Live log.
| Mode | What it does |
|---|---|
| SMS | Every selected SIM sends the same message to the Target number. |
| Call | Every selected SIM calls the Target number for the set duration. |
| Call 900 (Activate SIM) | The target number is fixed at 900 (the carrier's activation line). Each SIM calls 900, waits for the operator menu to answer, then presses 1 and 1 again, following the new-SIM activation script. About 15 seconds later it checks the phone number and balance again. This mode doesn't require the SIM to be fully "healthy", because SIMs that are not yet activated often aren't fully on the network. |
| USSD codes | If you type a code containing * or # in the Target number (e.g. *101#), that USSD code runs on every selected SIM, whatever mode is selected. Separate several codes with commas: *101#,*102#. |
| Top up | Tops up each number with a scratch card — see right below. |
Top up with scratch cards
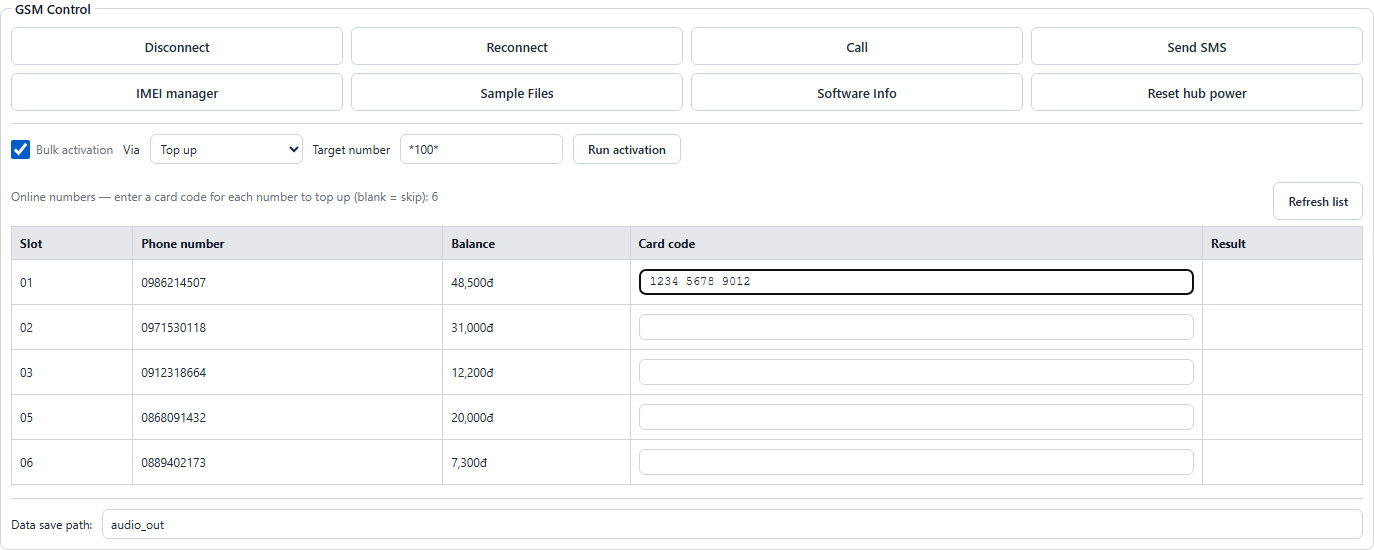
- Tick Bulk activation and choose Top up in the Via box. The Target number box fills in
*100*automatically —*100*is the standard top-up code of Vietnamese carriers (Viettel, MobiFone, Vinaphone). You can change it if your carrier uses a different code. - The table below lists the online numbers with their balance. Type the scratch card code into the Card code box of each number you want to top up (spaces and dashes are fine). Numbers left blank are not topped up. Click Refresh list if a new SIM has just come online; codes you have already typed are kept.
- Click Run activation. The software shows a confirmation list with the card codes masked (e.g.
*100*********9012#). Click OK. - Each SIM dials
*100*<card code>#by itself. The Result column shows the carrier's reply: green = success, red = error. Cards that were topped up successfully are cleared from their box; about 5 seconds later the balance updates by itself.
- a card code is not 8–20 digits;
- the same card code is entered for 2 numbers (a card can only be used once);
- a SIM has dropped off the network;
- the Target number box has the wrong format.
9Balance and expiry
- Automatic: when a SIM joins the network, the software checks its balance, expiry date and phone number once, using each carrier's own code (e.g. for Viettel it texts "TK" to 191; other carriers use
*101#). - Check them all again: click Get Balance next to the search box.
- The table header shows TK=0: the number of SIMs with zero balance.
- Topping up: see Top up with scratch cards.
10IMEI management
Click IMEI manager (admin accounts only).
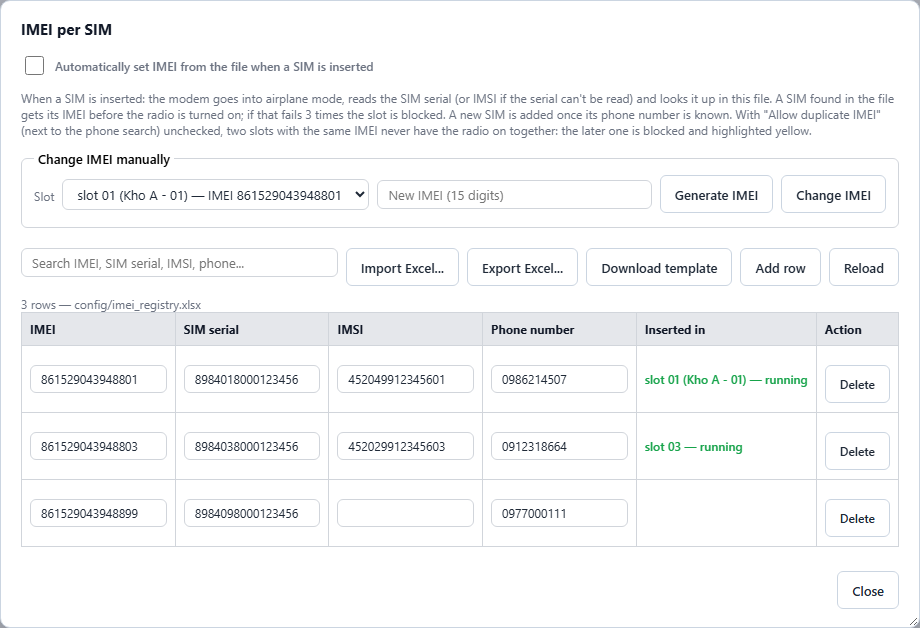
Changing the IMEI of 1 slot manually
- The Change IMEI manually panel only appears when automatic changing is not turned on.
- Choose the Slot, enter a New IMEI (15 digits) or click Generate IMEI to let the software create a valid IMEI of the same model line as your other modules that nobody is using yet.
- Click Change IMEI → confirm. The modem restarts with the new IMEI.
Changing the IMEI automatically per SIM
Tick Automatically set IMEI from the file when a SIM is inserted: when a SIM is inserted, the modem goes into airplane mode, reads the SIM serial (or IMSI) and looks it up in the table. If the SIM is in the table, the modem switches to exactly that IMEI before turning its radio on. If the change fails 3 times, the slot is blocked. New SIMs that aren't in the table yet are added automatically once their phone number is known.
- Import Excel...: replaces the whole table with the file. Columns: IMEI | Serial SIM | IMSI | Số điện thoại (phone number). Each row needs an IMEI plus a SIM serial or IMSI. Click Download template to get a file in the right format.
- Export Excel..., Add row, edit cells directly, Delete rows. The Inserted in column tells you which slot the SIM is currently in.
1160-Day History
The 60-Day History tab keeps every message, OTP, call and SIM action (balance, top-up, USSD) for 60 days. Older data is deleted automatically.
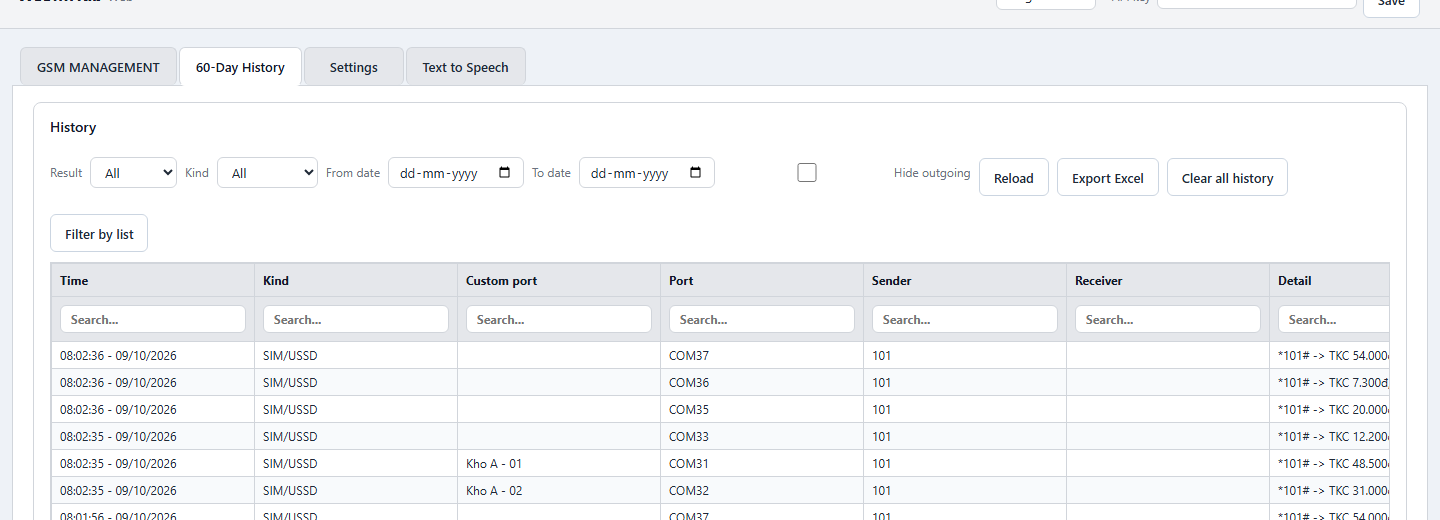
- Filters: Result (All / Success / Fail), Kind (SMS / Call / SIM/USSD), From date, To date. The Hide outgoing box is ticked by default so you only see incoming messages (OTPs); untick it to see outgoing messages too.
- "Search..." box under each column: quickly filter by number, content, port…
- Right-click a row: Read, Unread, Mark all read. Rows that have been read are dimmed.
- Click a content cell to copy the whole content. The Audio column has ▶ Play for recordings.
- Export Excel (up to 1000 rows), Clear all history (cannot be undone).
- Filter by list: paste a list of numbers or choose an Excel file (column A) to see every message/call with those numbers. You can further filter by SMS / Calls / incoming / outgoing, then export to Excel.
Live log

Below the SIM table, the Live log panel instantly shows messages/OTPs as they arrive (with the OTP code already picked out) and send results, newest first.
12Text to Speech
The Text to Speech tab creates .amr files (the format the modem plays during calls) from text you type. The voices are Vietnamese voices.
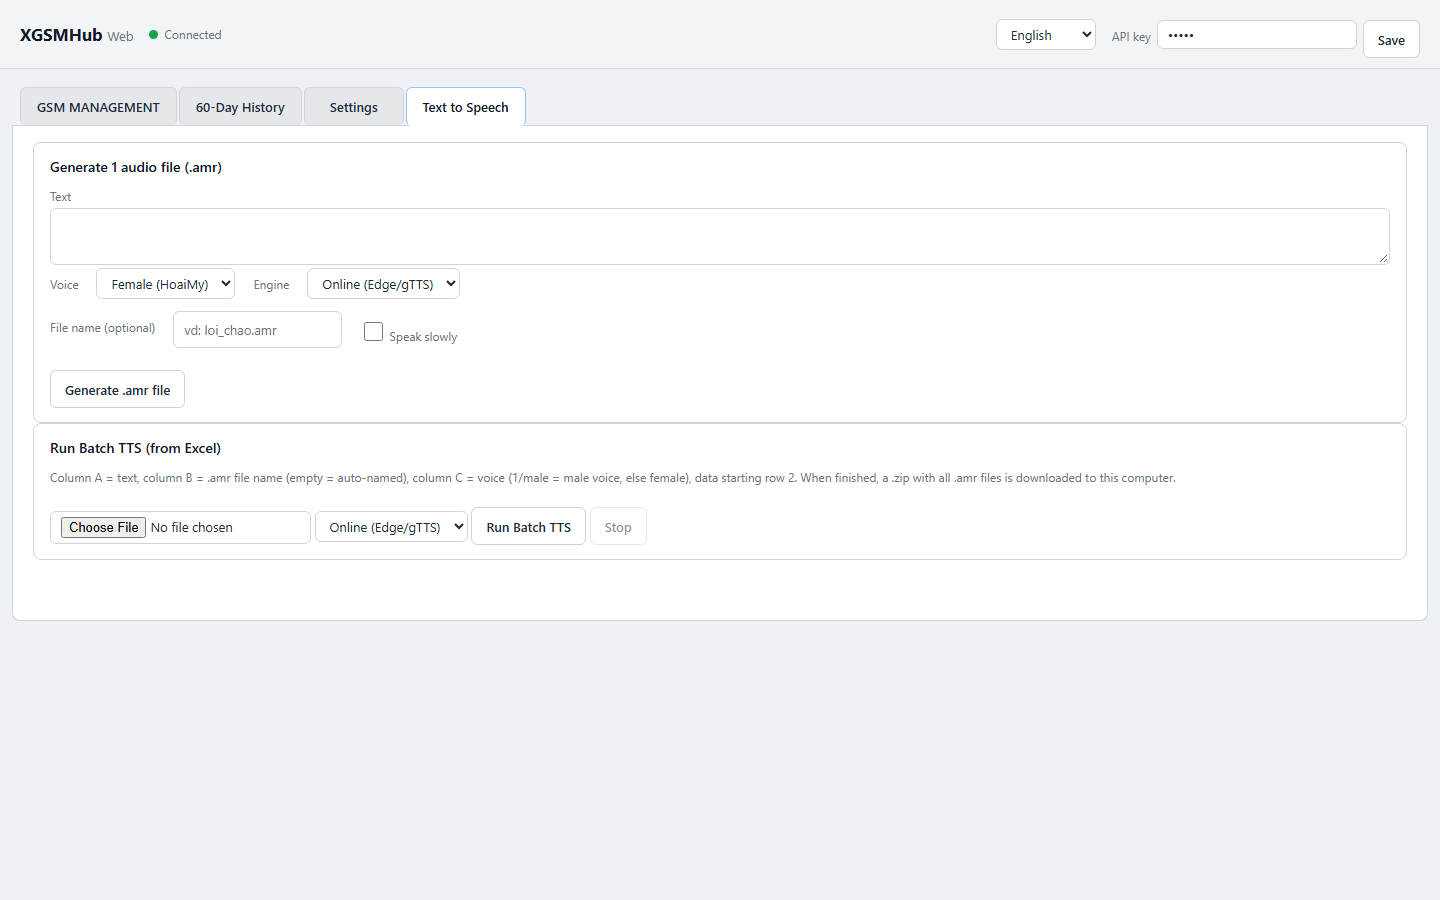
- Type the Text and choose a Voice: Female (HoaiMy) or Male (NamMinh) — both are Vietnamese voices. Tick Speak slowly if needed.
- Set a File name (optional) → Generate .amr file. The file is downloaded to your computer, and there is a player so you can listen to it first.
- Batch creation: an Excel file with column A = text, column B = file name (blank = automatic name), column C = voice (
1/nam= male, anything else = female), data starting from row 2. Click Run Batch TTS and you get one .zip file.
The Windows program also has: convert any audio file to .amr and try offline speech recognition.
13Remote use via the Gateway
Open the dashboard from anywhere (your phone, another computer) through gateway.xvooc.id.vn. No static IP and no router setup needed. Your messages and recordings stay on your own machine.
The Gateway portal is in Vietnamese, so its original labels are shown in brackets below.
First time: sign up and link your device
- Go to gateway.xvooc.id.vn → Sign up now (Đăng ký ngay) to create a portal account (password at least 6 characters).
- On Windows: Remote accounts tab → Connect to Gateway... (Kết nối tới Gateway...). Enter your portal account → Log in & Send request (Đăng nhập & Gửi yêu cầu). On Raspberry Pi: do this in step 3 of the first-time setup pages.
Alternatively: on the Gateway page, under Add new device (Thêm thiết bị mới), paste the Machine ID (Mã máy) (copied from the Remote accounts tab or the license dialog), give it a Label (Nhãn) (e.g. "Office PC A") → Send request (Gửi yêu cầu). - Wait for the XGSMHub administrator to approve it. The software checks every few seconds and connects by itself once approved — you don't need to do anything else.
- Create a device login account (see section 14). This is the account you use to enter the dashboard; it is different from the portal account.
Everyday use
- Log in to gateway.xvooc.id.vn with your portal account. The Authorized devices section (Thiết bị đã được cấp quyền) shows which devices are online.
- Click Open dashboard (Mở quản lý) next to the device you want → the dashboard opens; log in with your device login account.
14Staff accounts and port sharing
Remote access accounts
Create an account for each staff member so they can log in to the dashboard through the Gateway, and disable it when they leave.
- On Windows: Remote accounts tab → Add account..., Enable/Disable access, Change password..., Delete. The Go to management page button opens the Gateway page. (In the Windows program these buttons are in Vietnamese: Thêm tài khoản..., Bật/Tắt truy cập, Đổi mật khẩu..., Xoá, Đi tới trang quản lý.)
- On the web dashboard / Raspberry Pi (opened locally or through the Gateway, admin account): Remote accounts tab → Remote access accounts: enter a username and password (at least 6 characters), choose a role → Add account.
| Role | Can do |
|---|---|
| Admin | Everything, including IMEI manager, license renewal and settings. |
| User | Send messages, make calls, view history. Cannot see IMEI manager, change VoLTE or renew the license. |
| Sub-account | Only sees and uses the ports assigned to it. Cannot disconnect/reconnect, reset the hub or rename ports. |
Sub-accounts (sharing ports with customers/staff)
- Open the dashboard with an admin account (locally or through the Gateway) → Remote accounts tab → Sub-accounts (port sharing) → create an account.
- In the Port assignment table, use the Assigned to column to choose an account for each slot → Save assignment. Ports are assigned by physical USB port.
- The assigned person logs in through the Gateway with this account and sees only their own ports. If you delete the account, its ports go back to the admin.
15Settings tab
Only shown to admin accounts when the dashboard is opened locally (on the same LAN, or on the Raspberry Pi itself). Through the Gateway this tab is hidden for safety.
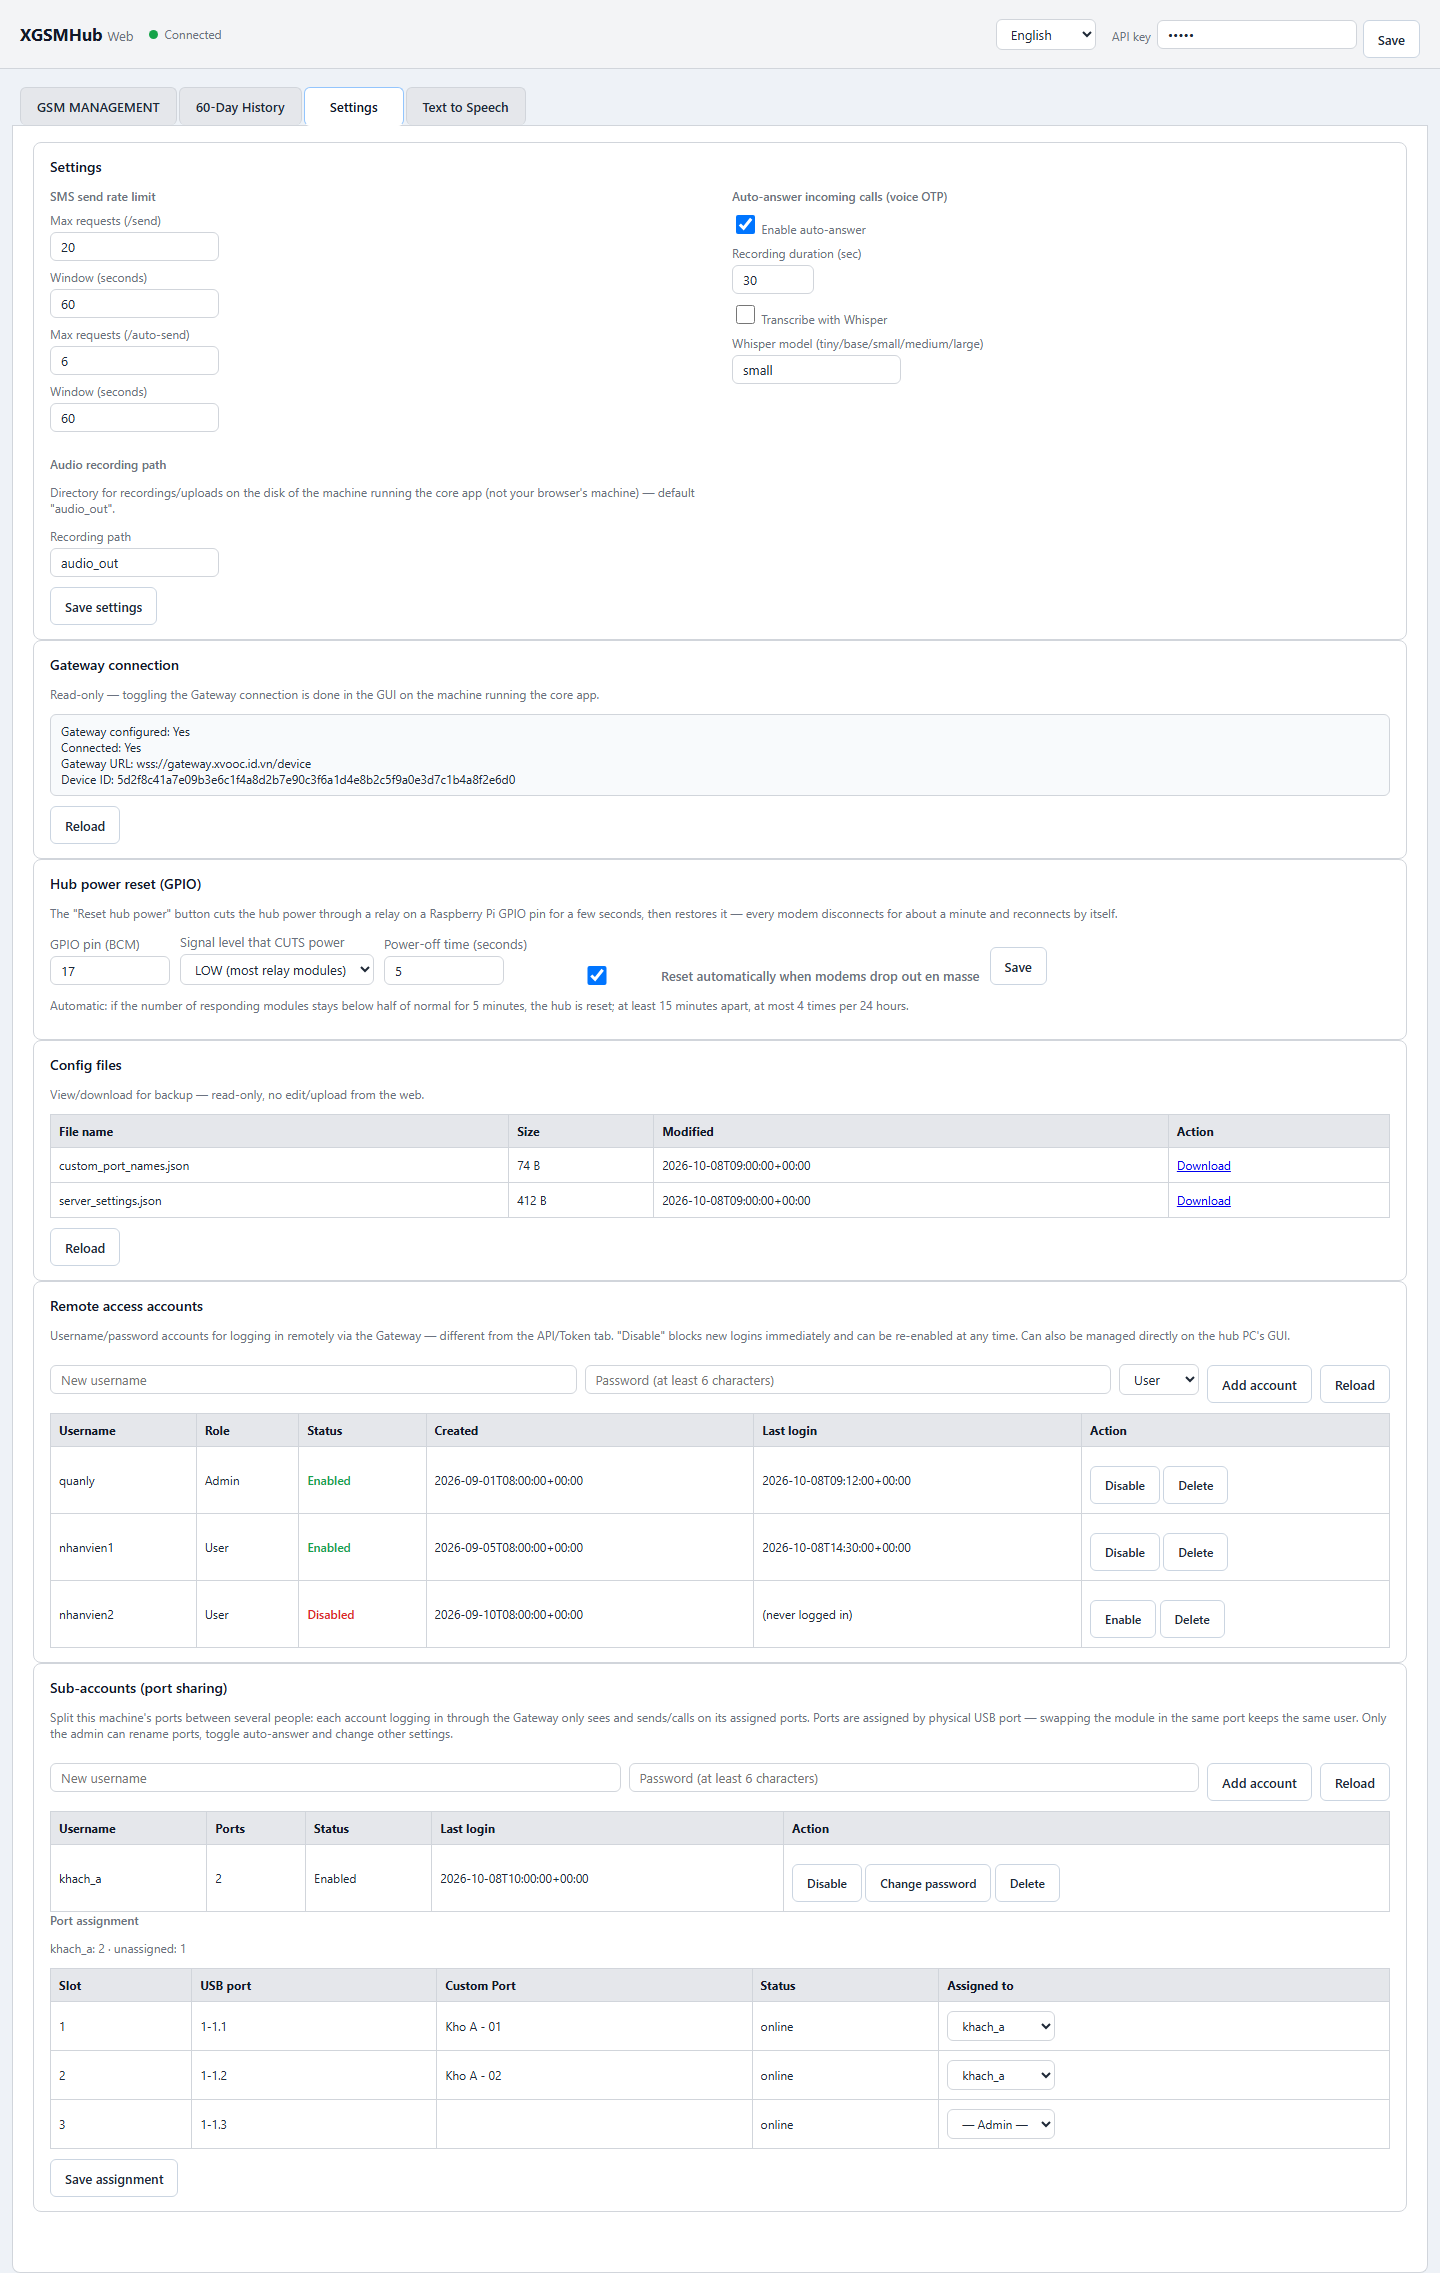
| Group | Contents |
|---|---|
| SMS send rate limit | The maximum number of send requests within a period of time (prevents floods of sends through the API). |
| Auto-answer incoming calls | On/off, recording duration, speech recognition (Whisper) and model choice. |
| Audio recording path | The folder on the machine where recordings are saved. |
| Gateway connection | Shows the connection status, Gateway URL and Device ID (read-only). |
| Hub power reset (GPIO) | Raspberry Pi only. See section 16. |
| Software update | Raspberry Pi only: Automatic updates, Check now, Update now. |
| Config files | Download the configuration files as a backup. |
16Raspberry Pi: monitoring and self-maintenance
The Pi is designed to sit far away (a warehouse, your home town…) and run for months without anyone looking after it.
Raspberry Pi status panel

Shown below the Live log and refreshed every 30 seconds: CPU, CPU temperature (yellow from 70 °C, red from 80 °C), RAM, Storage, Power supply, Uptime.
Automatic hub power reset
You need a relay module connected to one of the Pi's GPIO pins to cut the hub's power. Go to Settings → Hub power reset (GPIO):
- GPIO pin (BCM): the pin connected to the relay (e.g. 17). Signal level that CUTS power: LOW (most relays) or HIGH. Power-off time: 5 seconds by default.
- Reset automatically when modems drop out en masse (on by default): if the number of responding modems stays below 50% of normal for 5 minutes in a row, the Pi cuts the hub's power and then restores it. At least 15 minutes apart, at most 4 times per 24 hours.
- Manual reset: the Reset hub power button in GSM Control.
Self-protection against freezes, automatic updates
- Watchdog: if the Pi freezes for more than 14 seconds it restarts itself; if the software hangs for more than 3 minutes it is restarted automatically.
- Automatic updates: checks about every 6 hours, only installs properly signed versions, and only when no sending/calling job is running. If a new version fails, it automatically rolls back to the old one.
- Data clean-up: recordings and history older than 60 days are deleted automatically. When storage is almost full, the oldest recordings are deleted first.
17License and renewal
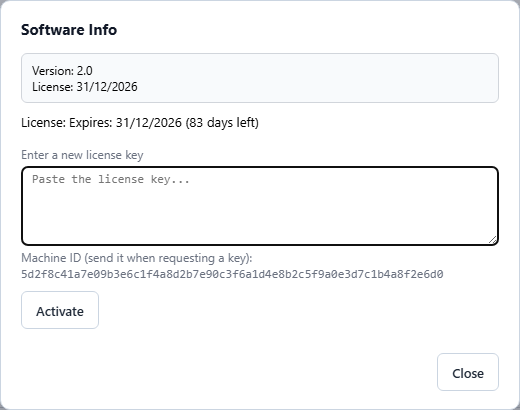
- Click Software Info to see the version and expiry date.
- When 14 days or fewer are left, the dashboard shows a renewal reminder bar at the bottom of the page. Click Renew.
- Renewing: send your Machine ID via Zalo to get a new license → paste it into the Enter a new license key box → Activate. You can do this remotely through the Gateway; the device restarts by itself in about 1 minute.
- When the license expires: the modems pause at the next restart, but the dashboard still opens so you can enter a new key.
18Troubleshooting common problems
A slot shows "offline" or doesn't appear in the table
Status "No SIM" or "SIM Locked"
The Module column is yellow with "SIM error / Weak signal"
The phone number / balance doesn't show
Sending fails for many messages
A slot is highlighted yellow with "Duplicate IMEI"
A top-up fails
Calls have no recording
I can't open the dashboard remotely
The Raspberry Pi shows "Under-voltage now!"
19Contact support
Need a license, remote installation help, or have a problem that isn't covered in this guide? Message us on Zalo 0968 338 547, call 0968 338 547, or email boolbits@gmail.com. Including a screenshot of the error helps us help you faster.